NetApp | Move Cifs/SMB Volume to another MetroCluster Site
This article describes how to move a CIFS FlexVol to another site within the same MetroCluster. We use asynchronous volume SnapMirror to copy the data, transfer a final snapshot and switch client access.
Environment
- Storage: An NTFS FlexVol serving CIFS/SMB shares.
- Volume namespace: The volume is mounted through a junction in the SVM namespace. The shares point to directories within that volume.
- Client access: The SMB shares are published through a DFS namespace. Users access the DFS paths rather than the storage server directly.
The SVM namespace and the DFS namespace are separate layers. During migration we recreate the backend shares and update their DFS folder targets; the user-facing DFS paths remain unchanged.
The destination is an independent, active SVM on Site B, not the source SVM's -mc DR partner. Its volume is placed on an aggregate owned by the intended destination node.
Highlevel:
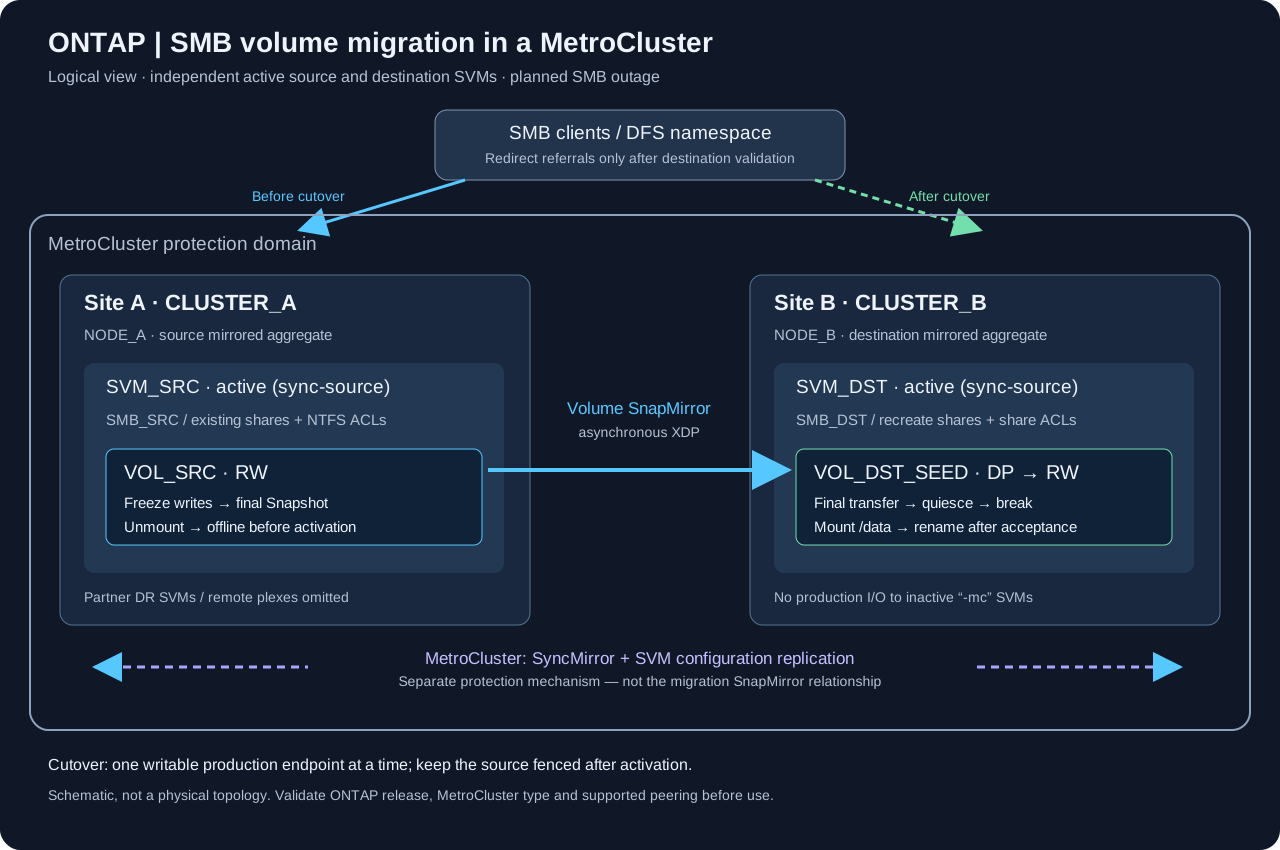
| Object | Site A | Site B |
|---|---|---|
| Cluster | CLUSTER_A |
CLUSTER_B |
| SVM | SVM_SRC |
SVM_DST |
| FlexVol | VOL_SRC |
VOL_DST_SEED |
| CIFS server | SMB_SRC |
SMB_DST |
| Destination junction | — | /data |
Confirm support for your ONTAP version and MetroCluster topology before starting: SnapMirror within the same Metrocluster. The full NetApp procedure requires a support login. The migration relationship is separate from MetroCluster's SyncMirror and SVM configuration replication.
What does SnapMirror transfer?
For volume-level SnapMirror, the important distinction is data versus access configuration:
| Item | Transferred? / Manual todo |
|---|---|
| Files, directories and existing qtrees | Yes |
| NTFS ACLs, including the SIDs they reference | Yes |
| Snapshot copies | According to the relationship policy and transfer selection. |
| Volume options | NetApp documents replication of source volume options. Still verify destination settings; do not assume the complete storage/service configuration is identical. |
| SMB shares, share ACLs and properties | Manual. Recreate names, paths, share permissions and settings such as ABE, caching or encryption. Share ACLs are separate from NTFS ACLs. |
| Junction path | Manual. Mount the destination volume at the intended path. |
| SVM-local users/groups and their identities | Not recreated. A same-named destination-local account has a different SID; copied NTFS ACL entries may therefore not work. |
| CIFS server identity, AD membership, DNS, data LIFs and SVM security settings | Not provisioned by this volume migration. Prepare and verify the destination SVM separately. |
Source: NetApp – What does volume-level SnapMirror replicate?.
Preparation
We are moving to another SVM, so the backend SMB server changes as well: the destination has a different server name and different data LIF IP addresses. Check and adjust the firewall rules before cutover so clients can reach the new SMB endpoint (normally TCP 445).
The user-facing DFS path stays the same, but clients connect directly to the SMB server returned by the DFS referral. An unchanged DFS path therefore does not mean the existing firewall rules are sufficient.
First of all check both clusters and wait for the health check to finish:
metrocluster show
metrocluster check run
metrocluster check show
metrocluster vserver show
storage aggregate plex show
Both selected SVMs must be active in normal operation; check their roles rather than their names. Resolve health issues first. If a switchover occurs during migration, stop and reassess the endpoints.
View and save the source configuration if necessary on CLUSTER_A:
volume show -vserver SVM_SRC -volume VOL_SRC -instance
vserver cifs share show -vserver SVM_SRC -instance
vserver cifs share access-control show -vserver SVM_SRC
➡️ I usually setup all my share ACLs with 'NT AUTHORITY\Authenticated Users' which have 'Change' rights. Thats it, the regulation should be done by NTFS ACLs (which will be copied during snapmirror).
On CLUSTER_B, prepare the destination SVM, an appropriately sized FlexVol on the correct aggregate, and supported cluster/SVM peering. The SVM peer relationship must allow SnapMirror. For CIFS security and hardening, have a look to my other post: Harden Netapp vServer CIFS.
Create and initialize the relationship on CLUSTER_B:
snapmirror create -source-path SVM_SRC:VOL_SRC -destination-path SVM_DST:VOL_DST_SEED -type XDP -policy MirrorAllSnapshots
snapmirror initialize -destination-path SVM_DST:VOL_DST_SEED
snapmirror show -destination-path SVM_DST:VOL_DST_SEED -instance
Finish the initial copy before downtime. Verify that the actual policy is async-mirror, and record the relationship ID and endpoints. The initial transfer runs while the source remains available. No client downtime is required, but replication consumes storage and network resources.
Implementation
⚠️ The following steps require a maintenance window. Notify affected users and application owners before proceeding.
1. Block source access to clients and create the final snapshot
Stop applications and jobs, close open files and prevent reconnects through all access paths. On CLUSTER_A:
vserver cifs session file show -vserver SVM_SRC -volume VOL_SRC
volume unmount -vserver SVM_SRC -volume VOL_SRC
volume snapshot create -vserver SVM_SRC -volume VOL_SRC -snapshot migration_final_YYYYMMDD_HHMM
The volume unmount command detaches the source volume from the client-accessible namespace without deleting it or taking it offline. Keep the source online for the transfer.
2. Transfer, verify and quiesce
On CLUSTER_B:
snapmirror update -destination-path SVM_DST:VOL_DST_SEED -source-snapshot migration_final_YYYYMMDD_HHMM
snapmirror show -destination-path SVM_DST:VOL_DST_SEED -instance
volume snapshot show -vserver SVM_DST -volume VOL_DST_SEED -snapshot migration_final_YYYYMMDD_HHMM
Wait for successful completion of this transfer. Verify its result/time, relationship health and that Newest Snapshot and Exported Snapshot match the final snapshot. Do not proceed with a running, failed or incomplete transfer.
snapmirror quiesce -destination-path SVM_DST:VOL_DST_SEED
snapmirror show -destination-path SVM_DST:VOL_DST_SEED -instance
Wait for Quiesced and repeat the transfer/snapshot checks. Quiesce lets an active async transfer finish and pauses future SnapMirror transfers.
The destination now contains the verified final data snapshot. Access configuration still needs to be completed separately.
3. Switch the writable volume
After verification, take the source offline on CLUSTER_A:
volume offline -vserver SVM_SRC -volume VOL_SRC
volume show -vserver SVM_SRC -volume VOL_SRC -instance
On CLUSTER_B, break the mirror, verify RW/online, then mount at an unused junction, in this example we use /data:
snapmirror break -destination-path SVM_DST:VOL_DST_SEED
volume show -vserver SVM_DST -volume VOL_DST_SEED -instance
volume mount -vserver SVM_DST -volume VOL_DST_SEED -junction-path /data -active true
Optionally you can rename the volume:
volume rename -vserver SVM_DST -volume VOL_DST_SEED -newname VOL_DST
volume show -vserver SVM_DST -volume VOL_DST -instance
Keep the source offline and general destination client access blocked while provisioning, including access through parent shares and DFS.
4. Recreate shares, adjust DFS Targetpaths and switch clients
Recreate the shares, their complete share ACLs and original properties. Adjust only the NTFS entries that actually need changing, such as source-local SIDs or administration groups.
For recreating the share you can use my powershell function, do the adaption as needed for your environment (dont use anything without understanding the content):
https://github.com/boogipro/public-scripts/blob/main/PowerShell/New-netapp_share.ps1)
Import-Module NetApp.ONTAP
. .\New-netapp_share.ps1

New-netapp_share -svmname 'SVM_DST' -sharename 'Finance' -svmvolumename 'VOL_DST_SEED' -nacontroller 'ControllerIP' -closeconnection
This PowerShell function applies my standard share configuration; it does not import the original share ACLs or properties. Compare its settings with your inventory and adapt them before cutover.
It creates /data/Finance as a share path, not a directory, and leaves NTFS permissions untouched. The share acl permission will set as recommended above: 'NT AUTHORITY\Authenticated Users' which will be grant 'Change' permissions.
Those Options will be also set to the share:
➡️ -AccessBasedEnumeration $true
Enables Access-Based Enumeration (ABE): Users only see files and folders within the share for which they have the required access permissions.
➡️ -ChangeNotify $true
Enables change notifications for SMB clients. For example, Windows Explorer can automatically reflect newly created, deleted, or renamed files.
➡️ -Oplocks $true
Enables Opportunistic Locks: Clients can cache file contents locally to improve performance; concurrent access is coordinated with the server.
➡️ -OfflineFilesMode 'none'
Disables caching through the Windows Offline Files feature for this share.
Before releasing client access, test the new shares with ordinary users, including denied access. Then replace the source DFS folder targets with the destination UNC paths and verify client referrals. Keep the old source inaccessible while cached referrals expire. A disabled DFS target alone does not block direct SMB access.
PostWork
- Apply/verify the volume snapshot policy and adapt any external monitoring systems.
- Update backup paths, jobs and service-account rights. Run a backup and restore a test file, including its permissions; preserve existing retention.
- Obtain application acceptance, then clean up the migration relationship using the recorded endpoints.
CLUSTER_B:
snapmirror delete -destination-path SVM_DST:VOL_DST_SEED
snapmirror show -destination-path SVM_DST:VOL_DST_SEED
CLUSTER_A:
snapmirror release -source-path SVM_SRC:VOL_SRC -destination-path SVM_DST:VOL_DST_SEED -relationship-info-only true
snapmirror list-destinations -source-path SVM_SRC:VOL_SRC
-relationship-info-only true removes source-side metadata while the source is offline, leaving snapshot/owner-tag cleanup for later. If endpoint records are ambiguous, specify the recorded -relationship-id. These commands do not delete the source volume.
Repeat the MetroCluster health checks. Keep the source offline for the agreed retention period; do not stop the entire source SVM if other services use it.
Rollback: before destination writes, consider restoring the retained source only after fencing the destination and verifying consistency. After destination writes, the source is stale: returning to it requires reconciliation, reverse replication or restore. A resync can overwrite data; it is not a quick undo.
Cutover checklist
- [ ] Support, MetroCluster health, destination node/aggregate and active SVM roles verified.
- [ ] Share/ACL inventory, backup and rollback agreed; initial copy complete.
- [ ] Writers and automatic updates stopped; final snapshot transferred successfully.
- [ ] Final newest/exported snapshot rechecked after quiesce; source offline before destination activation.
- [ ] Destination RW/mounted; shares, share ACLs, NTFS access and share properties verified.
- [ ] DFS/UNC consumers switched; permitted/denied access and applications tested.
- [ ] Snapshots, backup/restore and monitoring verified; cleanup and source retention documented.
- [ ] Final MetroCluster checks completed without unresolved issues.
References
- NetApp – SnapMirror update, quiesce, break and release
- NetApp – Create share ACLs and modify share settings
Cheers!